Does your wooden deck look faded, weathered, or dull? As the years pass, sunlight exposure, rain, and traffic will gradually damage any well-constructed deck. Traditional deck lasts only 10-15 years. The better news is that you do not need to dismantle it and rebuild it from scratch. A little elbow grease and the proper techniques will make your deck shine like the day it was first built.
This article will take you through restoring your deck in four easy steps. Whether your deck is young or several decades old and well beyond its prime, it will rejuvenate its natural splendor and lifespan.

Step 1: Inspect And Repair the Structure
Before cleaning and staining an aging deck, it is important to ensure the structure of the deck is stable and firm. It’s pointless to up something that could be weakened beneath its surface—consider this establishing the foundation for all that comes afterward.
What To Watch Out
- Loose nails or boards: Walk slowly along your deck and notice if any boards wobble or creak when you step on them and if any nails or screws are sticking out and could cause you to trip.
- Rotting and decay: Probe the wood with an awl or screwdriver gently along edges, stairs, and around the floor level since moisture will collect there. Soft and spongy wood indicates rotting.
- Mold or mildew: Gray, green, or black patches on the wood surface usually mean mold or mildew has grown there. They don’t just impact appearance but cause long-term damage if left unchecked.
- Rusty fasteners: Examine nails, screws, brackets, and joist hangers. Rusted or corroded fasteners will compromise the structural soundness of the deck with time.
How To Repair It
- Replace rotten wood: Replace any decayed or rotten boards with pressure-treated wood to ensure continued strength and protection against decay.
- Tighten loose parts: Refasten loose boards with galvanized or stainless-steel screws. Do not reuse existing fasteners since they could fail to fit securely.
- Treat minor rot: To repair small rotting regions, use wood hardener to reinforce the area and apply wood filler to rebuild the surface and sand down smoothly.
Making the effort to inspect and repair your deck during this period guarantees that not only are you treating it to a makeover, but you’re supporting its longevity and safety over the years to come.
Step 2: Clean The Surface Thoroughly
Once the structure has been repaired, the second part of restoring a deck is to thoroughly and deep clean it. Removing dirt and mildew, and weathered wood fibers cleans the surface so it will properly take the stain or sealer. Not doing this and/or rushing through this will cause finishes to bond improperly and won’t be durable long-term.
Select the Appropriate Cleaning Solution
Choose a deck cleaner depending on the condition of your deck. Commercial cleaners specifically made for wood decks are suitable to use, and those with oxygenated bleach are particularly effective in removing mildew and mold. A home remedy made from household bleach and warm water with some added detergent is suitable for general cleaning and mildew removal for do-it-yourselfers.
Pro tip: If your deck incorporates tannin stains from leaves or ingrained dirt, use a commercial cleaner that is designed to solve those problems.
Materials and equipment:
- Deck cleaner (oxygen bleach or commercial wood cleaner)
- Pump sprayer or garden sprayer
- A stiff-bristled brush or deck scrubber
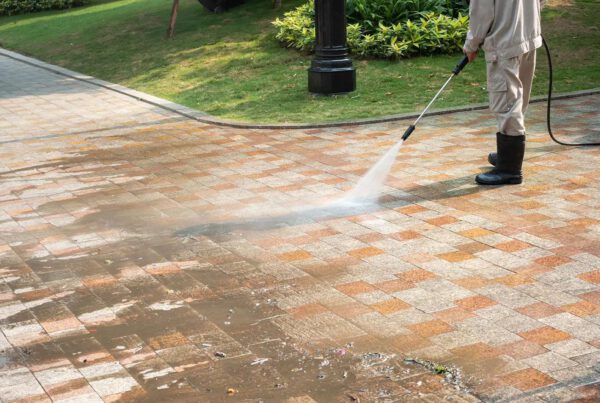
- Pressure washer (optional but very effective if used properly).
Cleaning process:
- Clear out the area: Clear the deck surface of all furniture, grills, planters, and trash. Follow the manufacturer’s instructions to mix your cleaning solution. Apply a garden or pump sprayer evenly to the entire deck surface.
- Let it soak: Let the solution sit anywhere from 10 to 15 minutes. The dwell period breaks dirt, mildew, and set-in dirt.
- Scrub the surface: To remove stubborn marks, particularly mildew or heavy dirt marks, scrub the area with a stiff-bristle brush or deck scrubber by hand.
- Rinse well: If using a garden hose, thoroughly rinse the deck to flush out all residues of cleaners.
If you are using a pressure washer, select its fan-type nozzle (never its pinpoint stream) and work with the wood grain. Keep the same distance—typically 12 to 18 inches—constantly to prevent gouging or damage to the wood fibers.
Step 3: Sand The Deck to Smooth Out the Surface
Once you have cleaned and stained your old deck, homeowners often skip sanding—but doing so is critical to having a professional-looking, long-term outcome. Sanding readies the surface to receive the new finish by filling in imperfections and allowing the correct adhesion.
Sanding does several jobs in the deck repair process. It takes away splinters, old coats, and rough spots left by cleaning. More critically, it opens the wood pores so sealers or stains can penetrate more evenly. Without sanding, you’ll risk an uneven or blotchy surface that will not weather well. Sand the wood in the direction of the wood grain to produce the most natural and uniform appearance.
Step 4: Stain and Seal the Deck
This is the final and most satisfying step in restoring your deck—when all your effort culminates into something worthwhile. Sealing and staining the deck makes it attractive with deep colors and shields it against harmful UV rays, moisture, mildew, and traffic. If accomplished properly, this step can greatly extend the life of your deck.
Selecting the Correct Stain
The right type of stain to use is very important to select. It will be based on your desired appearance and how protected you need your deck to be.
- Transparent stains protect against sunlight while preserving the visibility of the wood grain beneath. Good choice for newer decks with decent condition.
- Semi-transparent stains give just a little coloring and added protection while maintaining some visible wood texture.
- Solid color stains provide maximum protection, with most of the wood grain and imperfections being masked—ideal for aging decks requiring more dramatic rejuvenation.
- For extra convenience, opt for a product that offers sealer and stain in one package. It simplifies the application and guarantees overall protection in one operation.
Conclusion
Restoring your deck does not need to be daunting. With the right inspection, cleaning, sanding, and staining, its natural splendor can be revived. If you need effective, professional-grade cleaning solutions, there are services like TNWash with the right tools and know-how to make your deck shine like new with little work from you.